Administration Dashboard
Enabling access to the Administration Dashboard
The Password Pusher Administration Dashboard provides a web-based interface for managing your OSS self-hosted instance. It’s available at /admin and offers direct database access for viewing and managing pushes, users, and system settings.
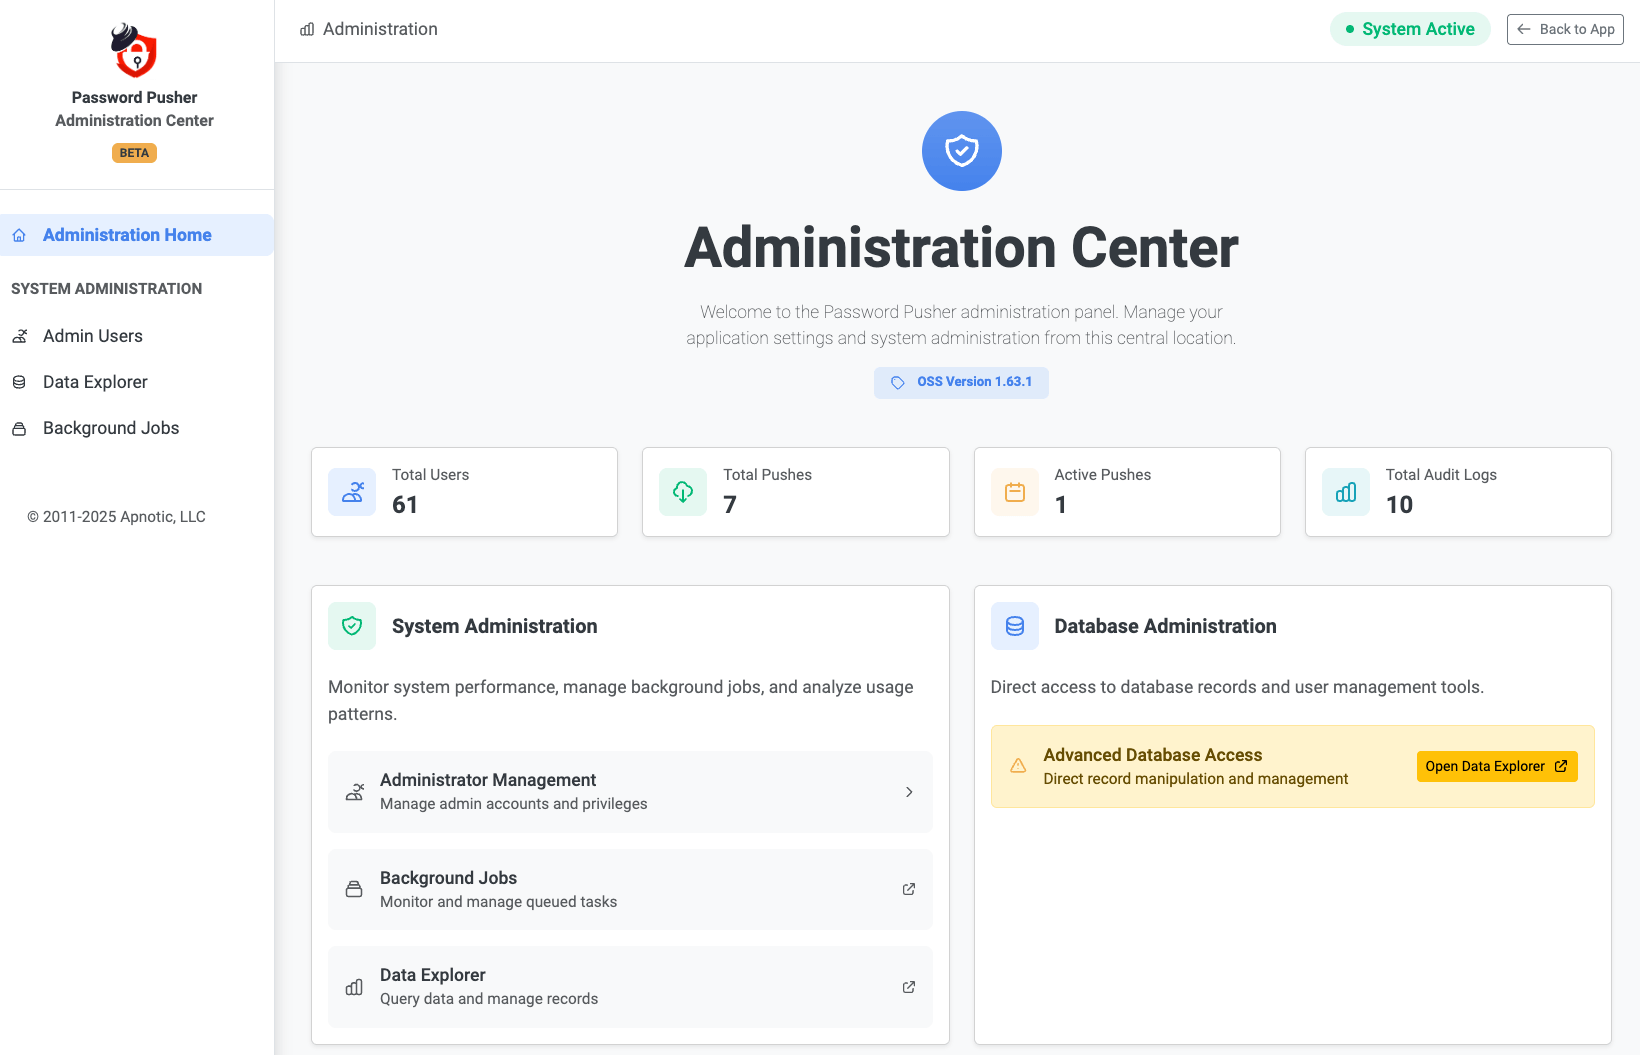
Version Requirement: Make sure you are running v1.40.3 or newer to have access to the Admin Dashboard.
Prerequisites
To access the Admin dashboard, you must have:
- Web sign-in available — The dashboard is reached after signing in at
/users/sign_in. Web sign-in stays available by default; setPWP__DISABLE_LOGINS=trueonly when you intentionally hide the sign-in UI (those routes then return 404, so/adminis unreachable in the browser). API-only setups typically won’t use the dashboard UI. - Administrator account — An account that is registered, confirmed, and marked as “Administrator”.
Security & Access
Important: Access to the Admin dashboard grants direct access to the application’s database. This includes the ability to view all pushes, user accounts, and system data.
Access is restricted to accounts that you specifically mark as “Administrator”. Make sure to:
- Only grant administrator privileges to trusted personnel
- Use strong passwords for administrator accounts
- Regularly review the list of administrators
- Consider using two-factor authentication if available
Restrict access to authorized personnel only to prevent unauthorized access and potential security breaches.
Managing Administrators
Administrator accounts can be managed using several methods. Choose the method that best fits your setup:
- Application Console Commands (Recommended) - Use built-in scripts for easy management
- Direct Database Access - SQL commands for direct database manipulation
- Application Console (Older Versions) - Ruby commands for versions prior to v1.51.2
Via Application Console Commands (Recommended)
The easiest way to manage administrators is using the built-in command-line scripts. These commands provide a safe and straightforward way to create, promote, demote, and list administrators.
Version Requirement: The following commands were added in v1.51.2. If you are running an older version, see Managing Administrators on Older Versions.
Accessing the Application Console
Open an application shell by accessing the server (or Docker container) where the application code resides.
For Docker installations:
# Find your container ID or name
docker ps

# Access the container shell
docker exec -it <container_id_or_name> bash

# Navigate to the application directory
cd /opt/PasswordPusher
For non-Docker installations:
# Navigate to your application directory
cd /path/to/PasswordPusher
Available Commands
There are four commands available for managing administrators:
| Command | Description |
|---|---|
./bin/create_admin |
Create a new administrator account |
./bin/promote_to_admin |
Promote an existing user to administrator |
./bin/demote_admin |
Demote an existing administrator |
./bin/list_admins |
List all administrators |
Create a New Administrator Account
Creates a new administrator account with the specified email address. The account will be automatically marked as “confirmed” and will not require email confirmation.
./bin/create_admin <email>
Example:
./bin/create_admin admin@example.com
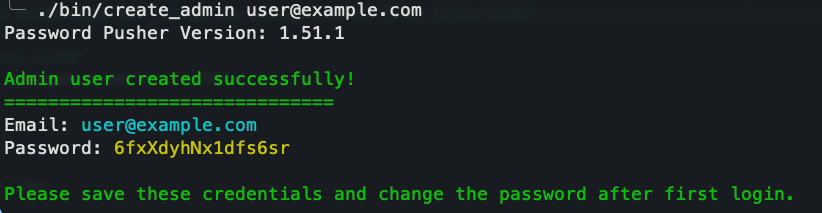
Note: After creating the account, the user will need to set their password. They can do this by:
- Using the “Forgot Password” link on the login page
- Or you can set an initial password via the database if needed
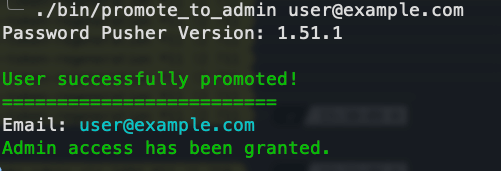
Promote an Existing User to Administrator
Promotes an existing user account to administrator status. The user must already have a registered account.
./bin/promote_to_admin <email>
Example:
./bin/promote_to_admin user@example.com
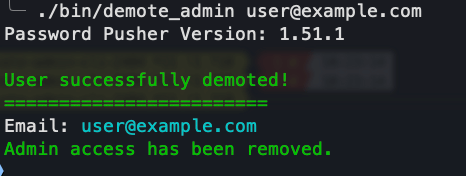
Demote an Administrator
Removes administrator privileges from an account. The user account will remain, but will no longer have access to the admin dashboard.
./bin/demote_admin <email>
Example:
./bin/demote_admin user@example.com
List All Administrators
Displays a list of all user accounts that currently have administrator privileges.
./bin/list_admins
Example:

Via Direct Database Access
If you cannot access the application shell or prefer to work directly with the database, you can manage administrators using SQL commands.
Warning: Direct database access requires careful handling. Make sure you understand the database structure and have backups before making changes.
Accessing the Database
For SQLite (default):
# If using Docker
docker exec -it <container_id> sqlite3 /opt/PasswordPusher/db/production.sqlite3

# If using docker-compose
docker compose exec pwpush sqlite3 /opt/PasswordPusher/db/production.sqlite3
For PostgreSQL:
# If using Docker
docker exec -it <postgres_container_id> psql -U <username> -d <database_name>

# Or connect from your host if PostgreSQL is accessible
psql -h <host> -U <username> -d <database_name>
Granting Administrator Privileges
For SQLite:
UPDATE users
SET admin = 1
WHERE email = 'user@example.com';
For PostgreSQL:
UPDATE users
SET admin = true
WHERE email = 'user@example.com';
Revoking Administrator Privileges
For SQLite:
UPDATE users
SET admin = 0
WHERE email = 'user@example.com';
For PostgreSQL:
UPDATE users
SET admin = false
WHERE email = 'user@example.com';
Listing All Administrators
For SQLite:
SELECT email FROM users WHERE admin = 1;
For PostgreSQL:
SELECT email FROM users WHERE admin = true;
Note: The admin column is a boolean. Use 1/0 for SQLite and true/false for PostgreSQL.
On Older Versions of Password Pusher
If you are running a version of Password Pusher prior to v1.51.2, the command-line scripts are not available. Instead, you can use Ruby commands in the application console.
Note: These commands only work on pre-existing user accounts. The user must already be registered in the system.
Accessing the Application Console
For Docker installations:
docker exec -it <container_id> bundle exec rails console
For non-Docker installations:
cd /path/to/PasswordPusher
bundle exec rails console
Granting Administrator Privileges
PasswordPusher.grant_system_admin!('user@example.com')
Revoking Administrator Privileges
PasswordPusher.revoke_system_admin!('user@example.com')
Verifying Administrator Status
user = User.find_by(email: 'user@example.com')
user.admin?  # Returns true if user is an administrator
Accessing the Dashboard
Once you have an administrator account set up:
- Log in to your Password Pusher instance with your administrator account
- Navigate to
/adminin your browser (e.g.,https://pwpush.example.com/admin) - You should see the administration dashboard
If you don’t see the dashboard or get an access denied error, verify that:
- Web sign-in is not disabled —
PWP__DISABLE_LOGINSmust not betrue, or/users/sign_inwill 404 and you can’t log in to/admin. - Your account is marked as administrator (use
./bin/list_adminsto verify) - You are logged in with the correct account
See Also
- Self-hosted configuration — Auth flags (
disable_logins,allow_anonymous,enable_user_account_emails, SMTP) - Upgrade guide (from 1.x) — Aligning env/YAML with current auth variables
- Application Console — Rails console for advanced operations
- Configuration strategies — Env vars vs
settings.yml